
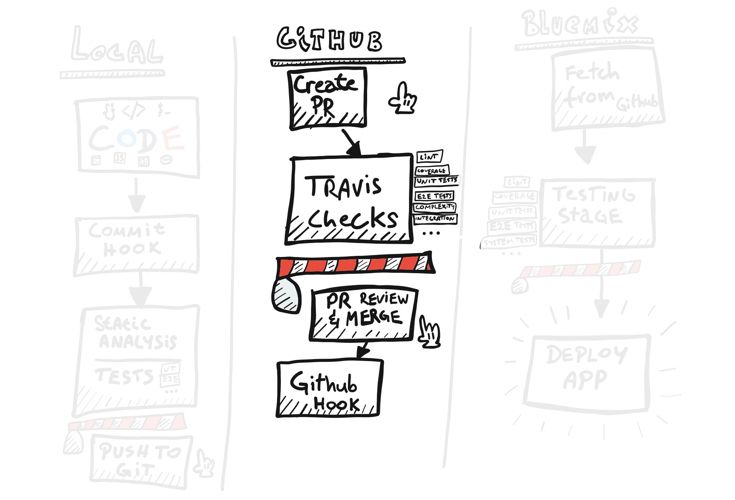
If you followed part 1 of this guide you should have a local eslint check script on your git repository and a pre-commit hook that prevents you from uploading dodgy code to Github. In this part we will look at one of many ways you can work with Github, taking into account code reviews and working in a team. We will enable the same eslint check in our secondary stage in Travis CI on a Pull Request (from now called a PR). This is the point before the code gets merged into the main repository; a place where you would usually review the code and check for potential mistakes, typos and generally bad code you might've missed. This is what we'll use Travis for.
Set up a Github repository
Before we continue you will need to create a new empty Github repo. I created one initialised with a README.md file.
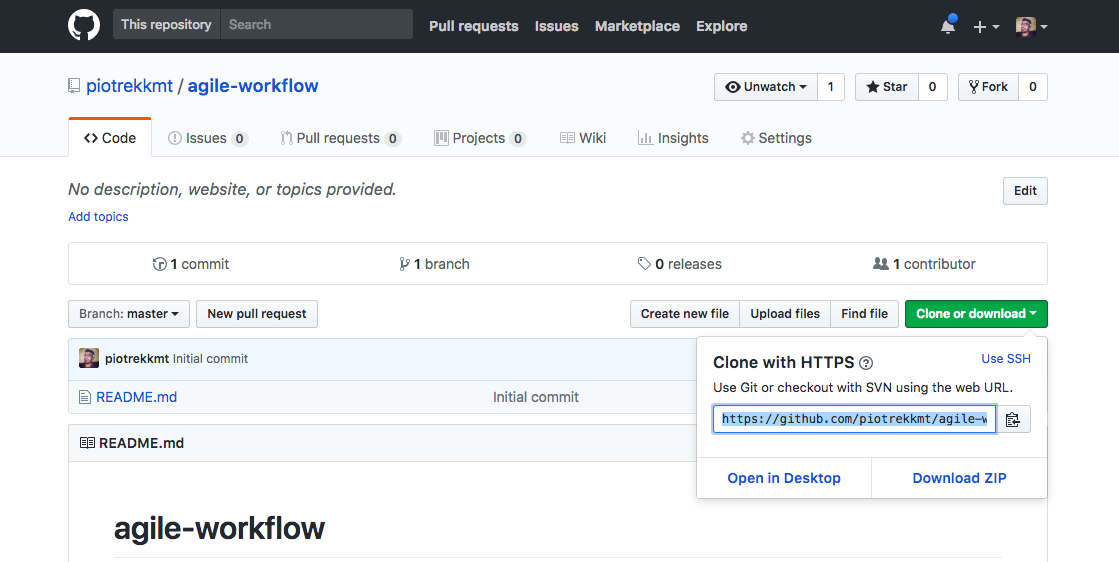
We will plug the newly created remote Github repository to our local git folder from step 1. To do that we will need to add a remote in our local git. To be in line with the standards we will call it origin. Open your git folder and run the command below:
$ git remote add origin https://github.com/YOUR_USERNAME/REPO_NAME.git
This will connect the local repository to the remote which will enable you to push code over to Github.
Note: this is using the HTTPS method to fetch and push to simplify the steps in this post. You should familiarise yourself with the SSH method which in the long run is easier to work with, mainly beause you won't have to type in your login details all the time.
Agile workflow with Github
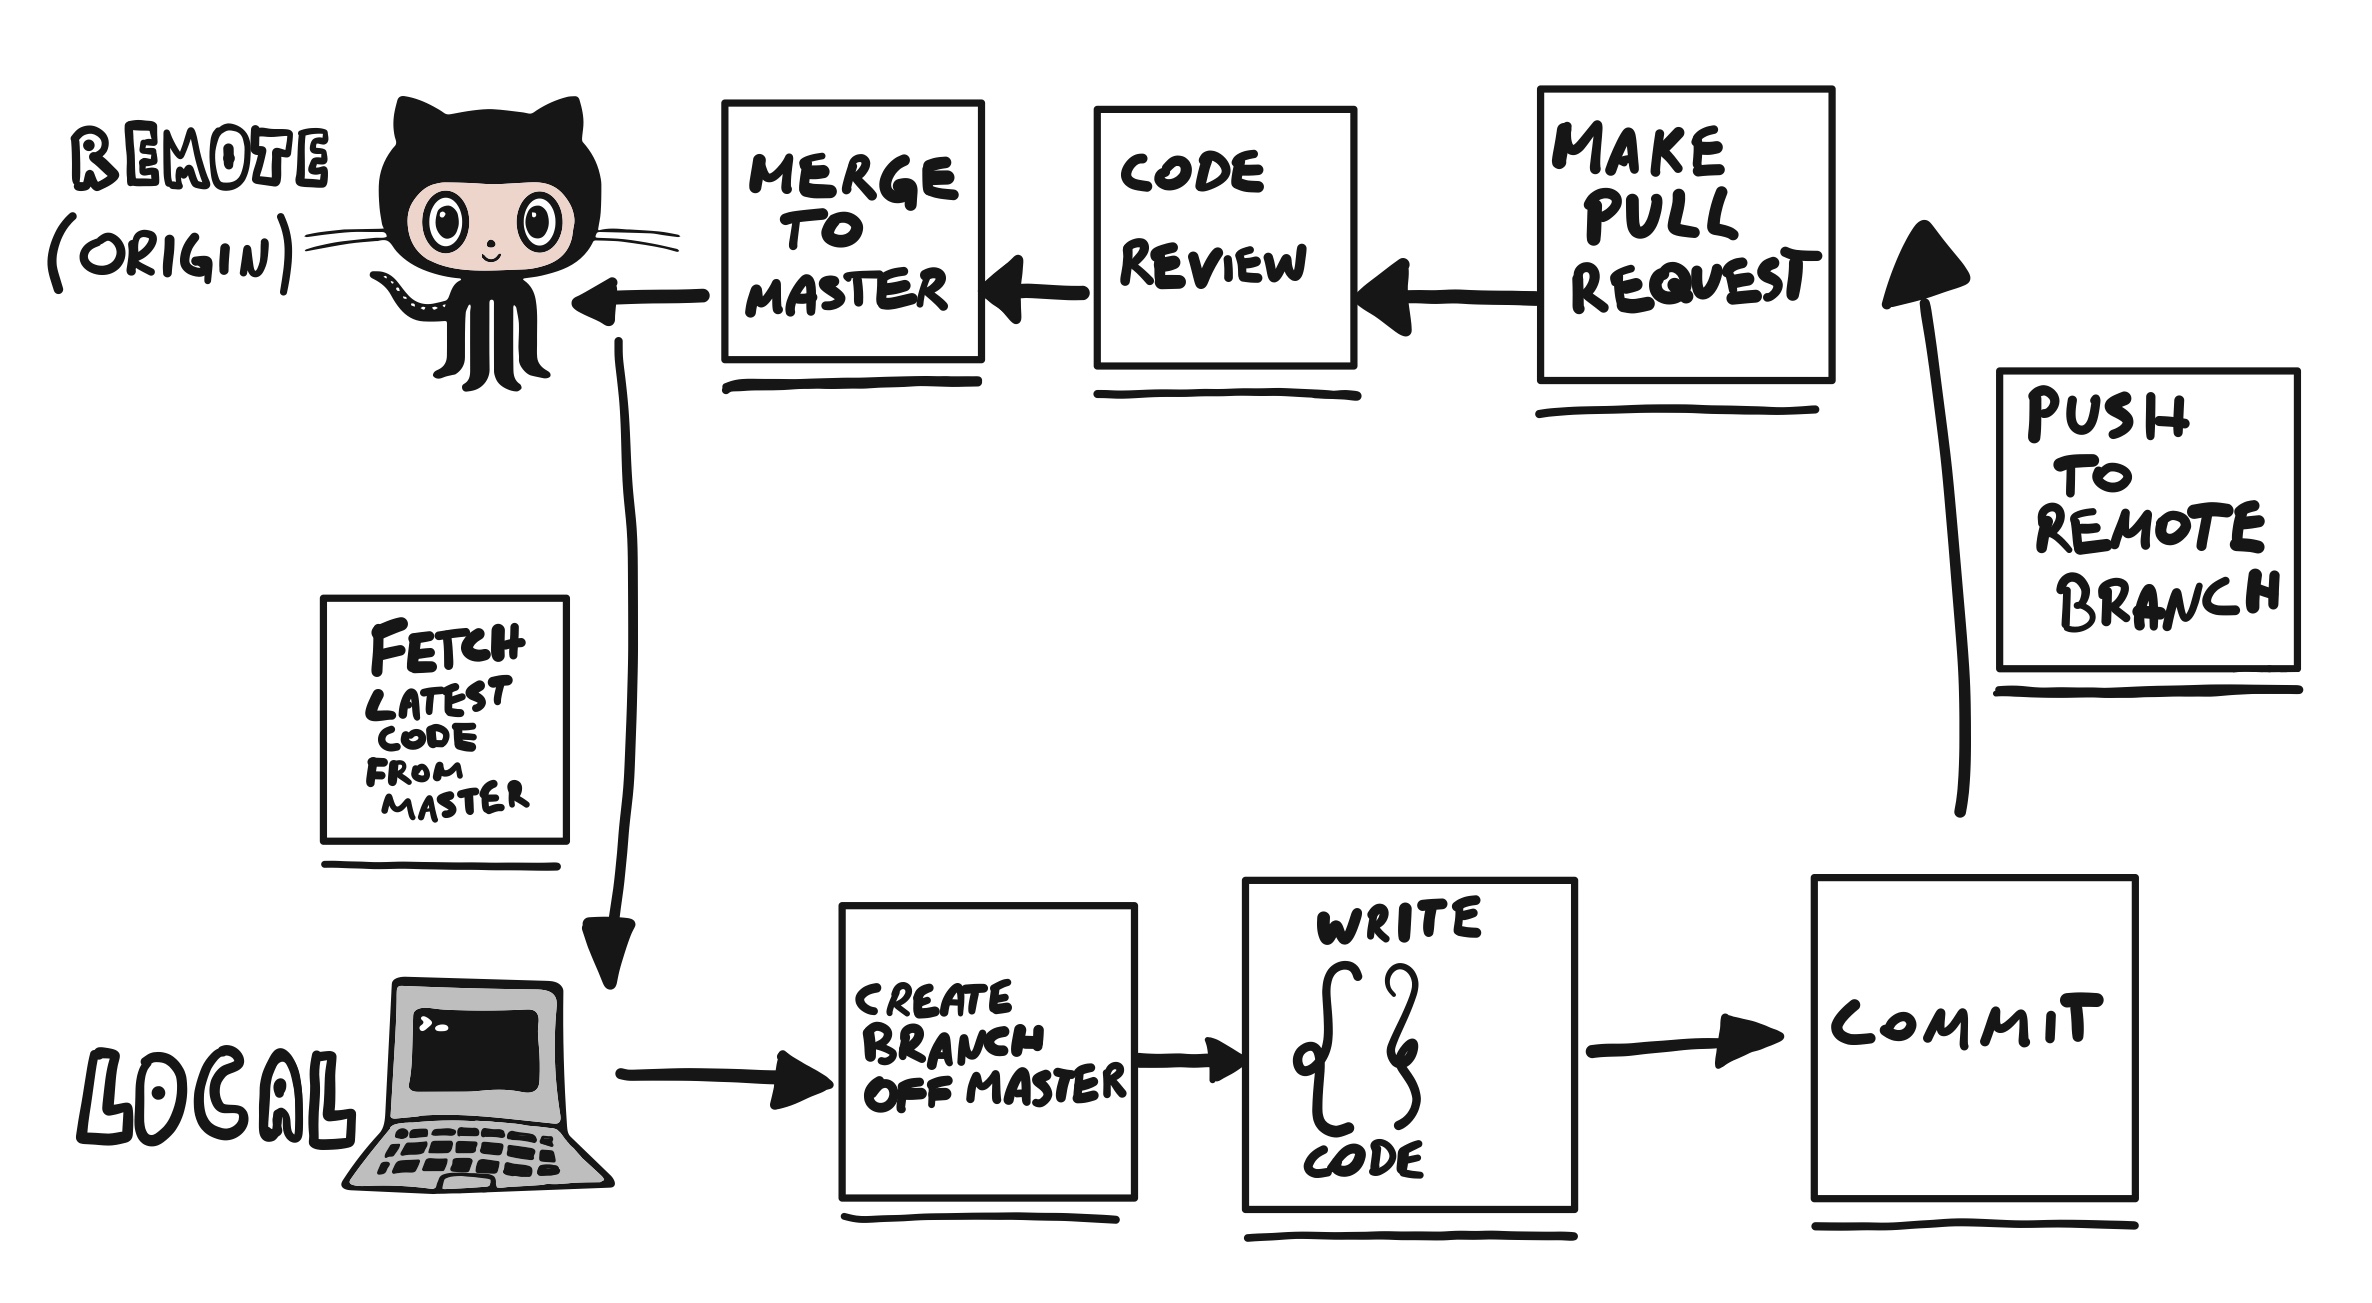
There is no right or wrong way of using Github really. The way you use it though generally depends on the size of your team. As a single user you could use a single master branch and use the repository as a one-to-one mirror of your local folder. That's perfectly OK, but by doing so you won't be able to use the full potential of git and Github.
In our case, we'll extend the single user work flow with an extra check & review layer, which will come in handy if the team grows. We'll introduce the concept of branches and pull requests. It also gives you the ability to take another look at your own code in context before it's merged with the master repo.
Here are a few concepts that you will need to know.
Branches
Git branches are effectively a pointer to a snapshot of your changes. When you want to add a new feature or fix a bug—no matter how big or how small—you spawn a new branch to encapsulate your changes. [Atlasian]
We will use branches to encapsulate a single task we want to tackle. This way we'll be able to come back to it any time. We will also be able to revert it easily if something goes wrong.
In my previous post I wrote about Github Projects and how you can use it to manage your project. Let's say the first task is to push the code that we wrote earlier to a Github repository. We will also include a file to enable Travis at the pull request stage.
Let's first fetch the latest changes from the remote and then create a branch in our local git repo folder with the git checkout -b [task_number] [remote_branch] command:
$ git fetch origin
$ git checkout -b task_1 origin/master
These commands will do a couple of things. Our local repository will download all the changes from the remote repo, but won't merge them into the master branch. The second command will create a copy of the remote repo on a clean branch called task_1, it will then put everything you already had in your folder on top of that. Keep in mind doing stuff this way might cause merge conflicts. In our case that shouldn't matter because our remote repository at this stage should be empty.
The default branch in git is called
masterand theoriginis typically your own repository fork.
In case you were working with more people you could create an organisation level repository, which other team members (including yourself) would fork in Github, in a way creating seprate remote instances (origins). In our case we only have a single remote repository so we can disregard this.
Two things to keep in mind - first, we will now refer to the remote repository as the origin. Second, the master branch is our production branch. That being said, we will deploy the production ready code from the master branch.
Commits
A commit is a packaged delta of your local changes. It can be a single file, or a bunch of lines in many files. This also includes removed lines! Git is flexible when it comes to the number of commits on a branch. I tend to stick to a single commit on a single branch, because it makes it easier to review code, but it's not a rule.
Push
A push is a git command that takes all commits on your current branch and pushes them to the remote repository. It can create a branch you pushed on the remote if it doesn't exist yet. You can also push to an existing remote branch.
Pull request
A pull request is a piece of code you want to suggest to copy over from one branch to another. As an example in the above workflow it would be the new task branch being pulled into the master branch. Notice that the code is pulled into the master and not pushed directly to it. It is a suggestion that can be rejected, amended or closed without resolution. At this stage team members would usually request each other to take a look at the code before it gets merged into the master branch.
Using Travis we will be able to test the code in this PR in context of what branch it's getting merged into before it is approved. Some quick quality checks can go a long way and speed up the review process.
Here we set the second barrier.
Second barrier
A pull request (PR) can be blocked from merging into the master repository if the code is not good enough. That is if any checks like eslint, unit tests, end-to-end tests, etc. fail the quality control. Using Travis we are able to run these checks here. Another advantage of merging code this way is that if there were more than one PR at the time and they had conflicting changes i.e. two people made changes to the same file at the same time, this fact would be caught here and block the user merging code before resolving the conflicts.
Travis
Let's add a new file to enable Travis here. We will call it .travis.yml.
$ touch .travis.yml
Then add in the code below:
language: node_js
node_js:
  - "10.15.3"
install:
  - npm install
script:
  - npm test
We will set the language of the scripts to Nodejs version 10. This is the current LTS support version as I write this. This could be any newer even numbered version if you read this at a later stage.
The install: will be executed before any of the scripts run. We will only have single commands in each of them but you can run anything you like. As this is a YAML file you can list script commands in a dashed list. If you'd like you could run a full end-to-end test suite here. In our case, we will run the npm test command which at the moment only runs the eslint tests. If we ever extend the test command, Travis will pick it up automatically.
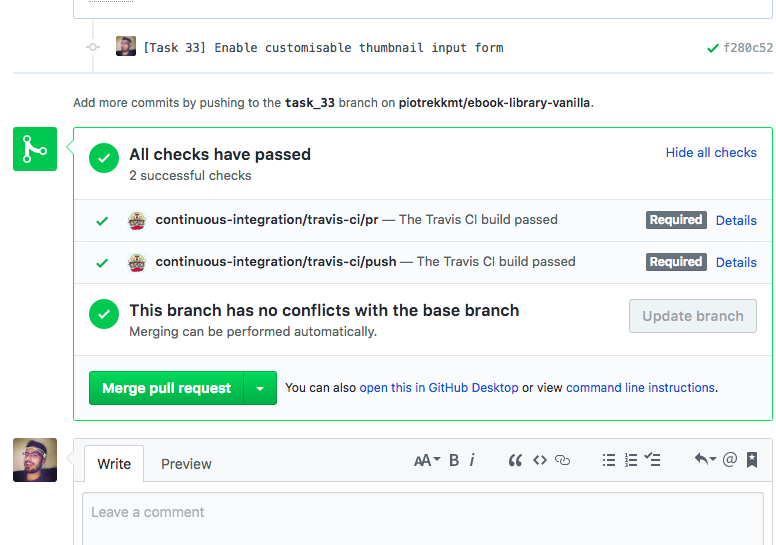
Travis checks will get picked up and show in the PR as a green tick if your code passes the lint tests.
Push to Github
OK, so we're at the stage where we can start adding in some code to our commit and push it into the remote to see if we set the barrier correctly. If you followed the previous post you'll have a commit hook and eslint set up in your local repository. We will need to add in the new files to the commit and push the extra travis file to your remote repository, in our case also being the origin. We can do that easily with the git add . command
$ git add .
$ git commit -m "[Task 1] Push some files to repo and enable travis"
After the commit check runs you will need to push the local commits to your remote repository. This will create a new branch in your origin called task_1 just like your local branch
$ git push origin task_1
We will now move over to the browser and open up your Github repository.
Github source control stage
Create PR
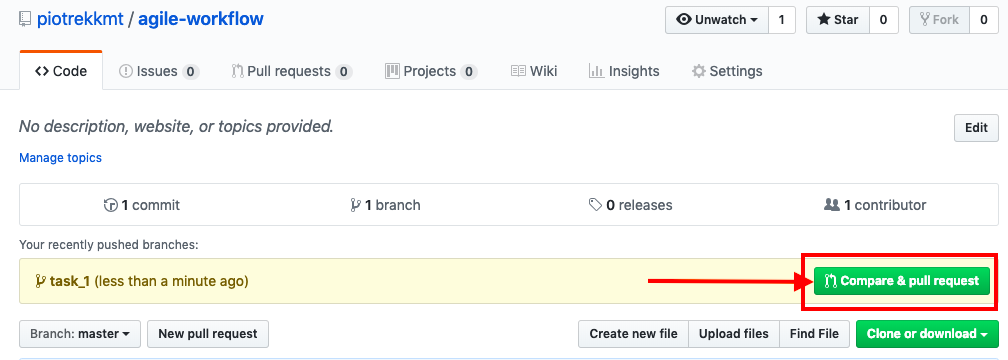
Your Github repository should automatically show a yellow box on the top of the code page showing the newly created branch. Press the green button to Compare [code] & [create a] pull request
PR review page
In Github your PR should look something like this. If you scroll down you can see your commit and all the changes you made in files added to this commit. The description is optional. You can now press Create pull request.
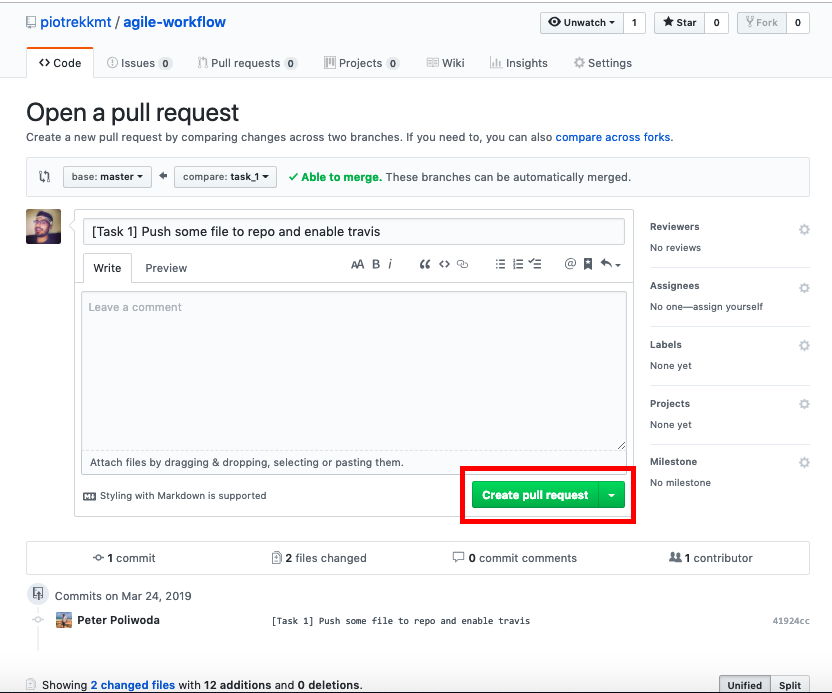
We are almost there. Your PR should now be there, waiting to be reviewed. This is where you can possibly assign some reviews if you'd like. Send somebody the link to the PR and they could look at the changes in context of the whole code, which makes it really handy.
Enable Travis checks
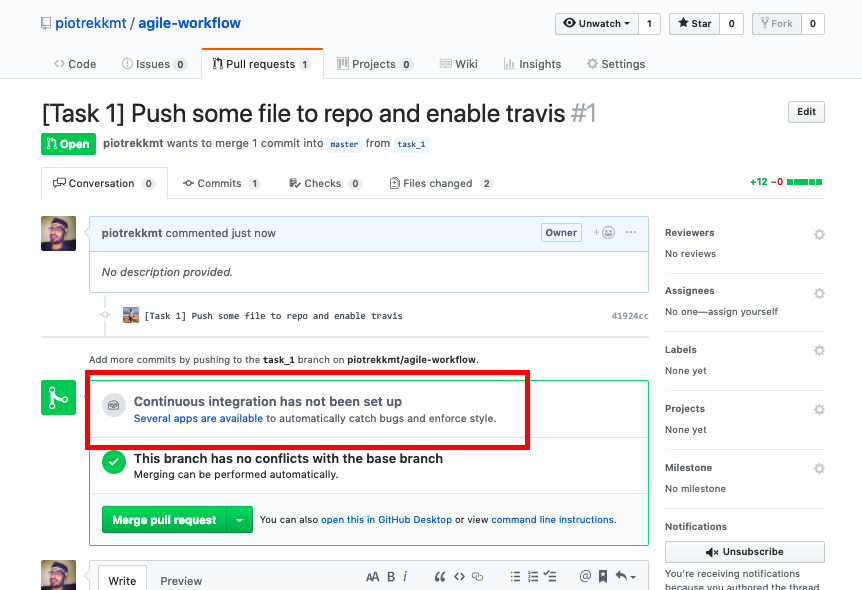
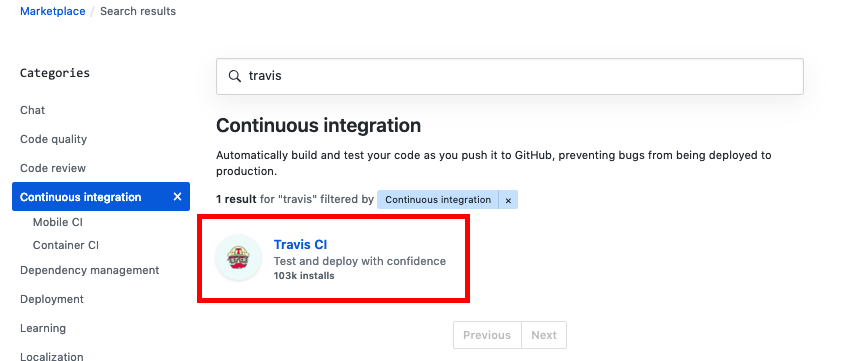
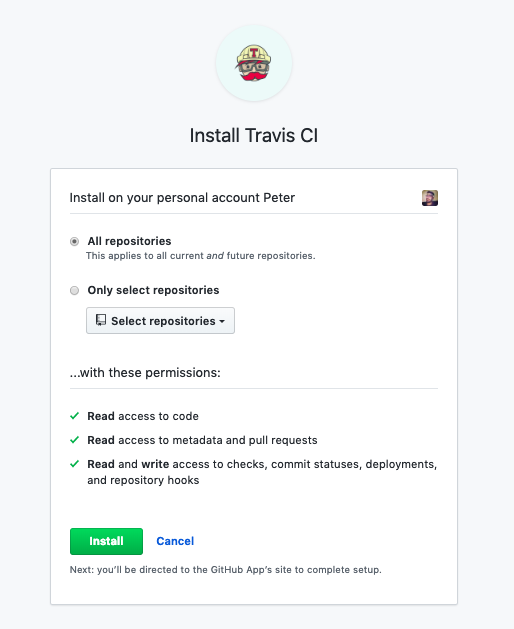
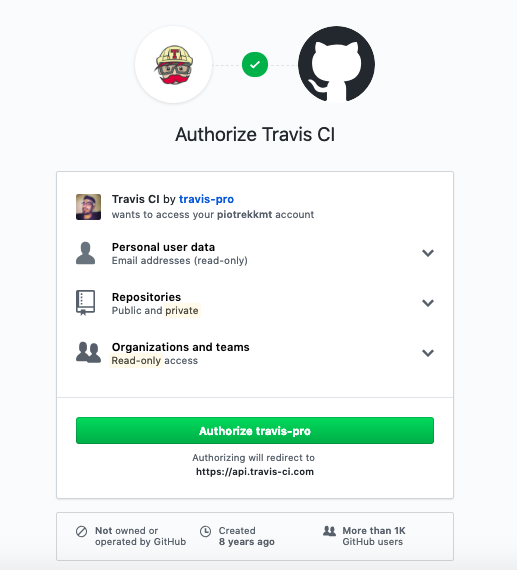
The PR is created, files are there but something is missing. Well, Github doesn't automatically add any app integrations, but it's nice enough to suggest them in your PR. Click on Several apps are available and add the Travis Github App to your Github repositories.
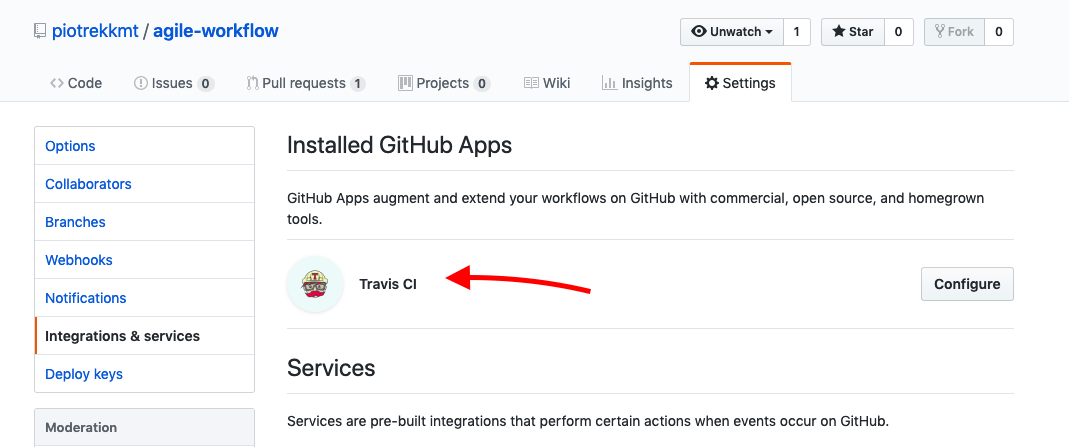
Once you're done you will see the Travis page. To check if everything is added properly to the repository you can take a look at your repository Settings tab. In the Integrations & services section you will find the Travis CI app.
Is it running yet?
Almost. The PR we already created will not be picked up because we enabled Travis after the fact. The checks will run on the next push. Let's create another commit and push it into the same branch.
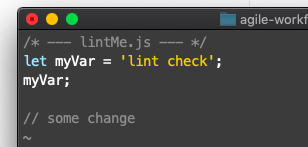
You can make a small change to your code now. Let's add a comment at the end of the lintMe.js file.
You can then git add the file, create another commit and push.
$ git add lintMe.js
$ git commit -m "[Task 1] Run travis now"
$ git push origin task_1
Now your Travis checks should be picked up by the app and your eslint tests will run.
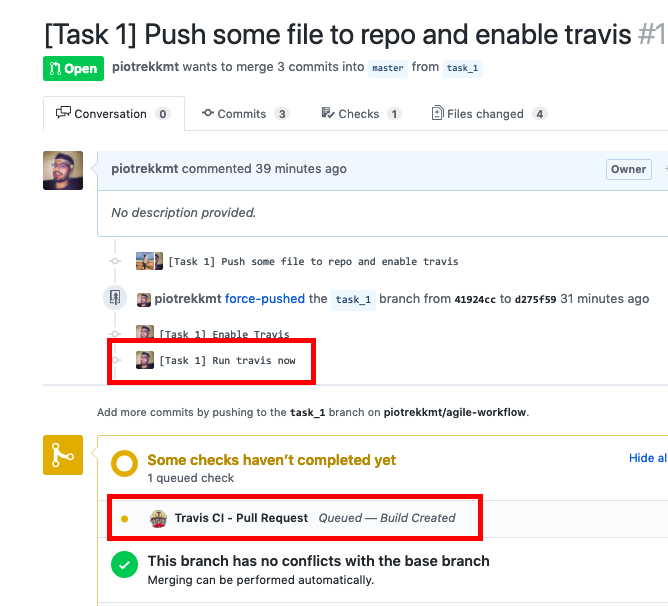
You can see both of your commits and the checks below in yellow. Yours will most likely have two checks on branch and PR. Once they're finished they will either give you a green tick, or a red cross depending if the files that you pushed were passing the eslint checks. If you did follow part 1 of this guide your commit hooks should prevent you from pushing changes that won't pass in Travis.
If they are failing, you might want to check if you pushed the package.json file and Travis is running the npm install and npm test scripts correctly. Also make sure you don't push your node_modules/ folder because that could cause trouble.
Two ticks or one tick?
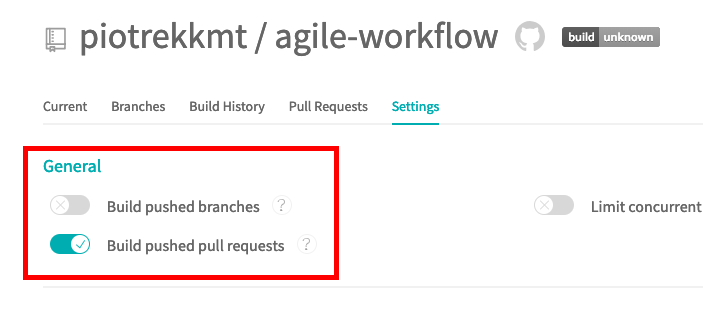
By default you'll see two ticks here rather than just the one in the screen shot. This is due to the fact that Travis is running a build on the branch and a build on the Pull Request.
You can go to your Travis page by clicking on the Details link in the PR. In Travis / Settings you can deselect the option to run builds on branches if you don't want to.

You could potentially leave it ON, and for example utilise some of the deploy capabilities of Travis. This is something I will talk about in the next post, which will be about the Third Barrier at the deployment stage. I will also mention how to run your app in IBM Cloud / Bluemix.
Preventing broken code from getting merged
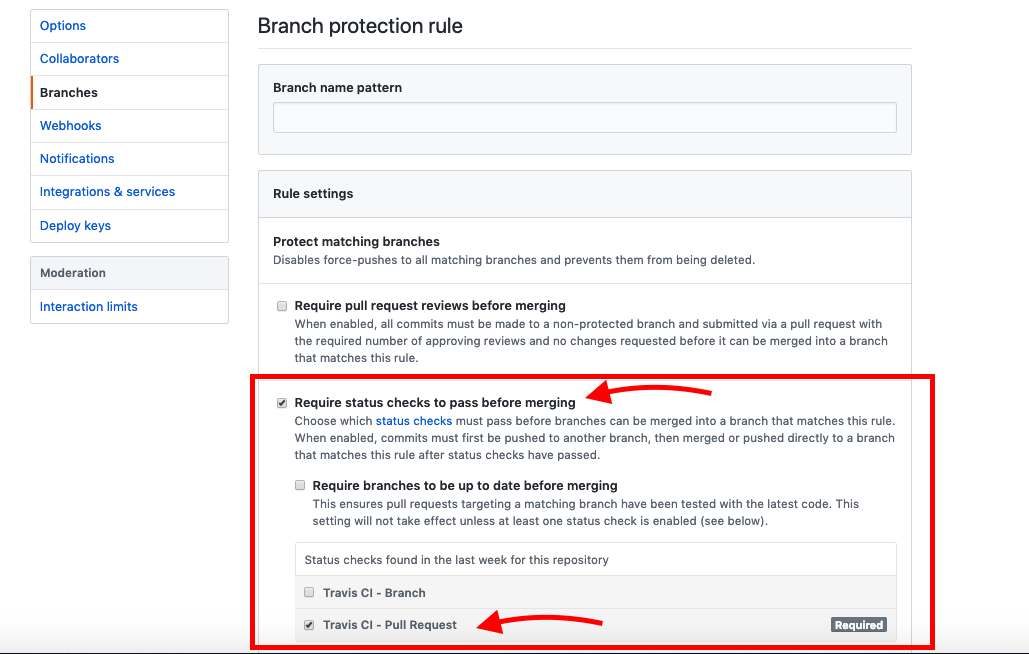
For a meaningful PR status check we can do one more thing. In the repository settings you can block the PR from getting merged into some of your branches. As we decided that the master branch is going to be production code, we wouldn't want to push anything to this branch if the status checks are not passing. It's a small thing that could be overwritten with administration privileges, if you really want to, but it will be screaming at you that it's broken, just in case you didn't notice the red X crosses everywhere.
You can do it in the Branches section of your repo Settings.
Oooff! OK, this was a long one, but I hope it was somewhat useful. As usual more to come.
Stay tuned.
Cześć!
Has this been helpful to you?
You can support my work by sharing this article with others, or perhaps buy me a cup of coffee 😊
