This is going to be a brief 3 part CI/CD framework overview using IBM Cloud as the hosting service. In part 3 will create a Continuous Deployment pipeline for your project on IBM Bluemix.
The objective of this exercise is to set up a Continuous Integration development framework for your project so that you can focus primarily on writing your app. The whole idea is to write code that gets checked before it's merged into the source code repository. Then, after all validation passes, it gets deployed directly onto your run environments. After all, there is nothing that prevents it from being deployed to a production environment directly if it works. It saves time, shortens the route from your laptop to prod and removes all the pains of deploying an app in intervals as you normally would back in the olden days.
As an example here I will be using my ebook library app, though the framework can be easily tweaked for any sort of apps, not only web applications. You can use this for IoT, Android, iOS mobile development or Docker container scripts. The important thing is that you test your app at various stages, especially when you build it on different environments. It's also quite useful when you work with other people or fork the code in multiple ways.
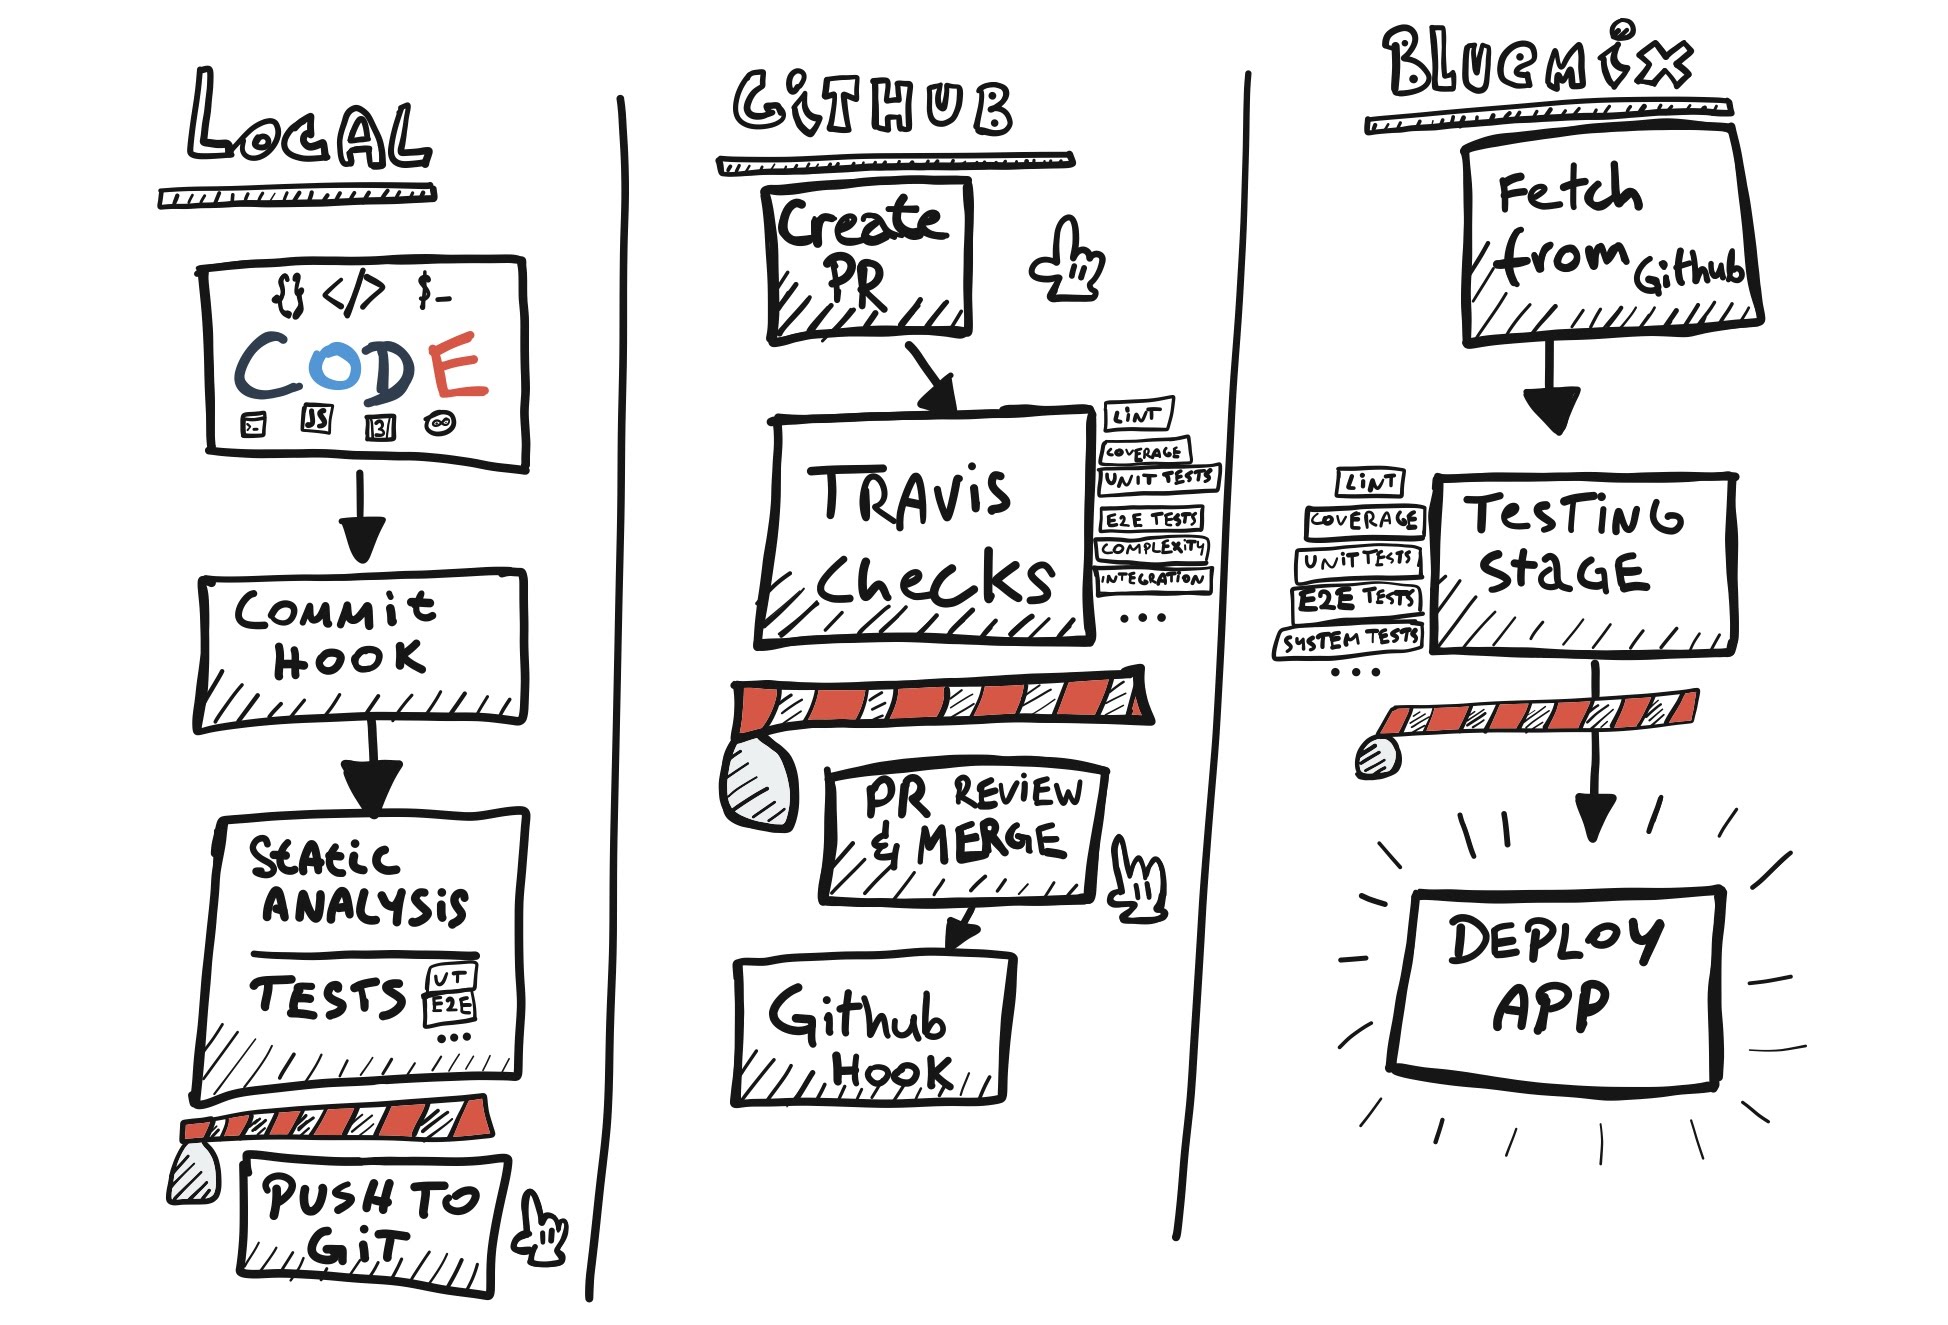
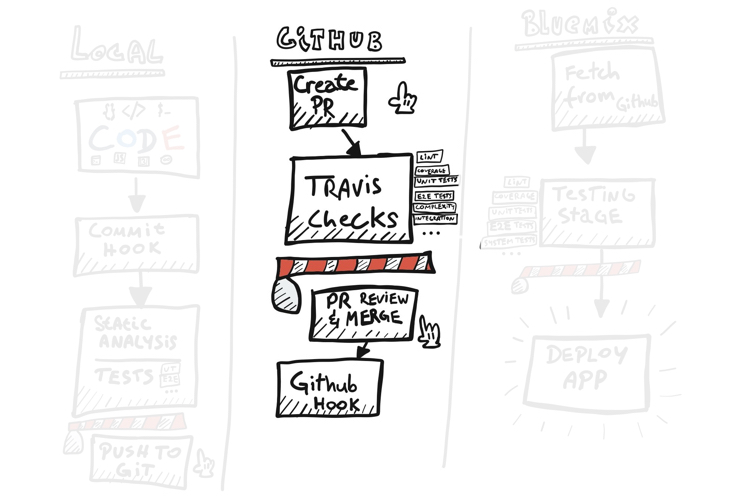
Code processing stages
The above illustration shows 3 logical stages that the code passes through from my local development environment to production. The final deploy job can point to a single app or deploy multiple apps at a time. It can have a manual approval stage where somebody with proper authority (i.e. the admin) approves it to be pushed to production.
In our case we will keep it simple and stick to a single Bluemix app.
Barriers
Every stage above has a red barrier somewhere along the way. They represent a point through which a piece of code will not pass if your code sucks. What I mean by this is it is a point where you run unit tests, static analysis, UT code coverage, complexity tests, e2e tests, etc. The red barriers are the limits you set yourself and they are extremely helpful in developing quality code. They won't always prevent you from making bad decisions or writing questionable features, but they will help you write clean code.
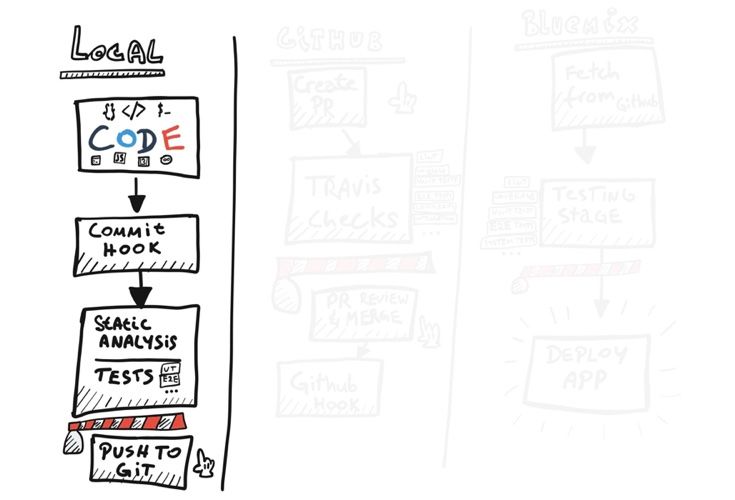
Local stage

Let's look at the first stage, starting with the piece of code you are delivering. A single piece of code that gets delivered needs to be small, managable and relevant to the task you want to achieve. It needs to be concise enough to quickly be able to review it. Remember, even if you are the only person writing the code, you want to be able to understand it in a couple of months time.
It would be beneficial if you familiarised yourself with the concept of User Stories. This way you're able to divide the code into managable chunks that can be tested. A user story’s description starts with "As a user I want to... [do something, see something, etc. ]". Not every task is easy to write in this way, but it’s a good practice to stick to.
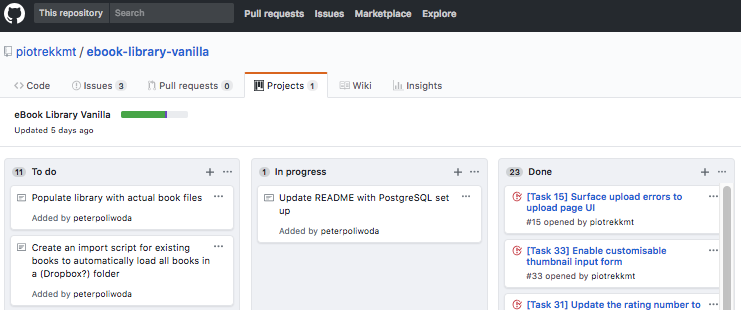
In case of the eBook Library I used Github Projects to manage my workflow. I divided my work into three columns: To do, In progress and Done.
Then populated the To do column with everything I need for a Minimal Viable Product, a product that is not perfect, but usable and fully functional.
Whenever I start working on a task, I put it into the In-progress column on the Github project wall, then move it to Done once it's delivered. Github Projects has another interesting feature - each task can be converted into an Issue. Once created, an issue gets a number. You can refer to issues in comments on Pull Requests by typing #YOURNUMBER, i.e. #36.
In the description of a pull request you can type 'This PR closes #36'. The word closes and the #hashtag are keywords that automatically close the Github issue on your project wall once the pull request is closed. One less job to do. Way better than Trello, Zenhub, Jira et al.
"Scrum? Yes scrum..."
Here's a video from Silicon Valley that explains how to work this way.
The funny thing is, this was not a team developed product but I still followed some of the principles behind scrum like retrospectives and standups, where I looked back at what I did and decided what I'm going to work on next.
Pre-Commit hooks
Once you're happy with a piece of code you've written, it is ready to be committed. This is where the fun starts. Git is packed with loads of cool features like hooks. We will create a pre-commit hook which will run a simple eslint script before our code gets committed. ESLint is a utility that enforces coding standards on JavaScript code. It checks for example, if there are spaces between the keyword function and the brackets () like so function () as opposed to function(). It is also very useful to prevent dirty code, like unused variables, using spaces and tabs together, etc.
There are many JavaScript coding styles. Some of you may prefer one way or another. The important thing is to stick to one style and keep the code consistent across all files. We will use the standard eslint recommendations in this exercise.
Let's set up a git pre-commit hook. For this you will need a git repository folder on your machine. Create a new folder in a location of your choice and browse to it in your teminal window (we will run commands on MacOS terminal but the Windows Git Bash should work the same):
Let’s create a git repository folder and initialise it
$ mkdir myGitRepositoryFolder
$ cd myGitRepositoryFolder
$ git init
In the repository directory create a new folder called git_templates
$ mkdir git_templates
Browse into the templates folder and add in another folder inside of it called hooks
$ cd git_templates
$ mkdir hooks
Inside of the hooks/ directory create a file called pre-commit. In the file you will add commands you want to run before every commit. Because this is a NodeJS application we will add in the standard nodejs test command npm test. We will also need to chmod +x the file so that git is able to run it.
$ touch pre-commit
$ echo 'npm test' > pre-commit
$ chmod +x pre-commit
Back in your main repository directory you will need to find your package.json file and add in the test script so that git has something to run before a commit.
Since we don't already have a package.json file we will create it with the npm init command and then follow the steps.
$ npm init
In your package.json file you will need to find the scripts object and add in a line to test your app.
{
  "name": "ebook-library-vanilla",
  "version": "0.0.1",
    ...
  "scripts": {
    "start": "node app.js",
    "test": "RUN-TESTS-COMMAND",
Let's make this test command useful and add in the eslint check. To do that we will need to install eslint and then add in a javascript file or folder to check before the commit. This will ensure your JavaScript is properly formatted using the default settings.
Note1: We will save the eslint module to the development scripts, meaning this module will not be installed on production, because there's no real need for it there.
Note2: these can eventually be tweaked to support various styles, i.e. AirBnB, Github, Google, IBM, etc.
$ npm i eslint --save-dev
We will need to add in an eslint configuration file or initialise it ourselves. Let's add in a small .eslintrc.js configuration file with the recommended settings for node and ES6.
$ touch .eslintrc.js
$ nano .eslintrc.js
/* --- .eslintrc.js --- */
module.exports = {
 'env': {
    'node': true,
    'es6': true
  },
  'extends': 'eslint:recommended'
};
Now let's create a JavaScript file to check if your lint works. By default, eslint should return an error if you have variables that are declared but never used. In a new file called lintMe.js write a piece of JavaScript code:
/* --- lintMe.js --- */
let myVar = 'lint check';
Now you can test if linting works by running eslint command on the lintMe.js file
$ eslint lintMe.js
If all goes well you should be getting an error similar to the one below
  1:5  error  'myVar' is defined but never used  no-unused-vars

✖ 1 problem (1 error, 0 warnings)
We will now add the eslint script into the npm test script to be able to quickly run static analysis tests on our code
{
    ...
  "scripts": {
    ...
    "test": "eslint lintMe.js",
Running npm test should give you the same result now.
$ npm test
Lastly we can re-initialise our git repository with the git_templates hook to run the eslint tests before any git commit
$ git init --template=git_templates
To test if it works you can now git add your file and try to commit it.
$ git add .
$ git commit -m "test eslint"
You should be getting an error and the commit go through.
Now let's try to solve the ESLint problems by using the variable for something. Update the lintMe.js file with the following code:
/* --- lintMe.js --- */
let myVar = 'lint check';
myVar;
Committing the code again should now pass without errors.
$ git add .
$ git commit -m "test passing"
If this was a real piece of code, you would now push your code into the repository.
Local barrier
First barrier set. You now have a git repository that prevents you from committing bad code. ESLint is just the tool we needed for the job. This of course does not mean that it's finished at all. The npm test script can (and really should) run multiple tests. ESLint itself can test whole directories and most of all the pre-commit hook should be used to run unit tests so that you don't break existing functionality when commiting a piece of code. You can also check for test coverage, check the complexity of the code and report all that to the user to make sure your barriers are being respected.
We have the basic script in place. In part 2 of this CI/CD introduction we will focus on the Github / Source Control stage and how it uses TravisCI to run the same tests on a Pull Request. We can also block the ability to merge a Pull Request into our code repository if the tests fail, but that's coming in the next part.
Stay tuned for more Tales from the South Pole.
Cześć!
Updated 14 May 2019:
Part 2 available now at:
 Tales from the South Pole